User Account Creation
This guide will go step by step through the process of creating a new user account and password encryption.
Create the Authentication Form
Add a new form, i’ve called this Authenticate.cs as it will be used for the login form, which will check for a valid username and password before allowing a user to proceed any further in the application.

Open your form and add two text boxes, one for the Username and a second for the Password. Resize your form appropriately. The form in my example below also shows the addition of two Labels, which help to identify the purpose of the text boxes. You can see a screenshot of this below.
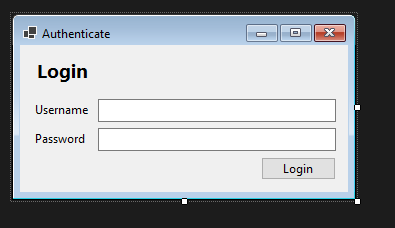
Make sure that you name your text boxes using the naming conventions we have already discussed, for example txtUsername and txtPassword make sense. These not only identify them as text boxes, but also provide a unique name which will come in handy as we begin to add our programming code.
Your next step is to ensure that you have a Database, and table created - you should already be at this point. If you’re not, go back to last weeks guide and catch up. You will need this for the next steps.
Create a New User
Now that you have the form created we need to provide a method in which it’s possible to add new users to the system. Your Database setup with SQLite will help with this from last week.
Make sure you have a table in the database called Login, this avoids any restricted keywords being used which may cause issues with LINQ later on when it comes to querying the database.
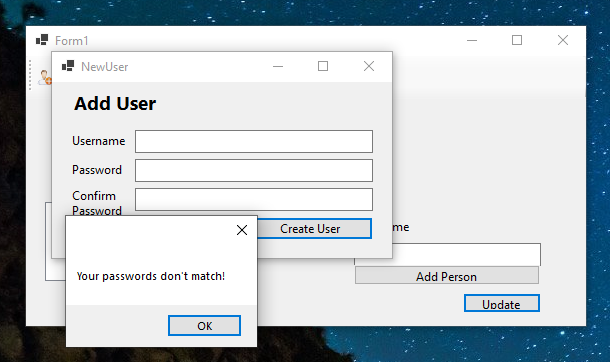
Create a new form called NewUser.cs then add a username, password and confirm password field, as below. Name these appropriately following our naming conventions. My example form you can see below. I’ve used the following names for each control.
-
txtUsername - Username Input
-
txtPassword - Password Input
-
txtPasswordConfirm - Password Confirmation
-
btnCreateUser - Create button

To start adding functionality, in terms of code to this form, double click the Create User button to enter the code view. Which will look something like the screenshot below.
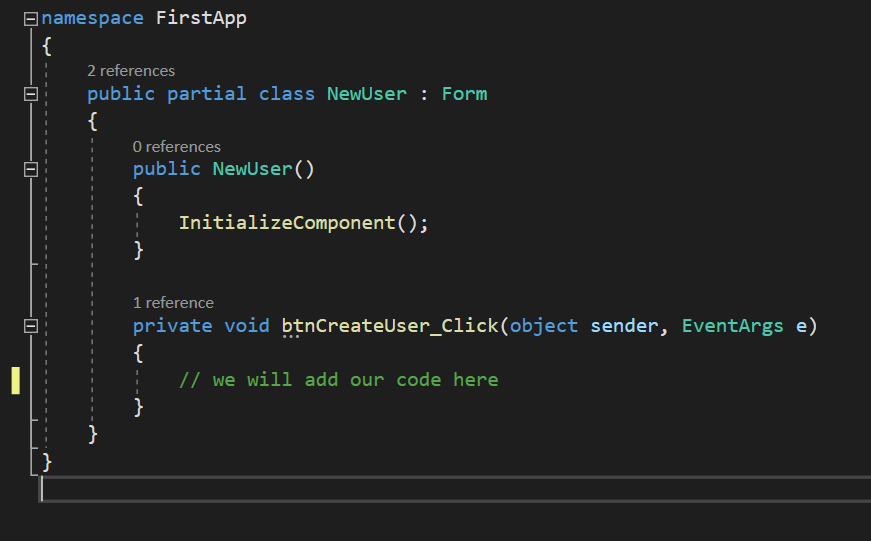
I’ve highlighted where we will be adding our C# code. This needs to be within the curly braces for the click action of btnCreateUser. This is important, as we only want to attempt to add the database entry for our user if the user of our application clicks the Create User button. In other terms they need to be ready!
Add the following code within the curly braces.
var context = new DataContext();

// if the connection to the database is successful
if (context.Database.CanConnect())
{
    // setup the new object read for insertion
    var Login = new Login();
    Login.Username = txtUsername.Text;
    Login.Password = txtPassword.Text;

    // once the object is built insert it into the database
    context.Login.Add(Login);
    context.SaveChanges();
}
Let’s now take a step back and understand exactly what is happening here… These first few lines, create a way for us to access our Data Context, stored in an object called context. This gives us access to our tables, and model data.
var context = new DataContext();

// if the connection to the database is successful
if (context.Database.CanConnect())
{
The if statement checks to make sure that we’re actually connected to the database before we attempt to do anything else. Fairly simple so far, what’s the point in trying to add data to a database we’re not connected to after all.
The key, and new part of today’s code is looking at how we create a new record to insert data into the database. The following snippet of code takes care of that.
     // setup the new object read for insertion
     var Login = new Login();
     Login.Username = txtUsername.Text;
     Login.Password = txtPassword.Text;

     // once the object is built insert it into the database
     context.Login.Add(Login);
     context.SaveChanges();
}
On the first line (following the comment) we’re creating a new object of type Login, that means we’re creating a instance of the Login table in simple terms, we can now use this to follow the structure outlined in our Model. That means that we can use intellisense to help us pick the fields we require. Your can see in the code snippet above the first is Login.Username, Username is a field within the Login table in our database.
Next we’re saying take the value that we enter into the text box called txtUsername and assign it to that field. We’ve done nothing directly with the database yet, this is all just assignment.
The next line (context.Login.Add(Login)) tells the database to take our new Login record and actually add it to the database, once we’re happy its there we save the changes.
That’s it the record should now be in our database. But wait…we missed something!
Validate the Password
At the moment there are a few fundamental issues with our create user form, one is that it allows us to enter a password without checking it matches with the txtConfirmPassword textbox, the second is that its not encrypted - we shouldn’t ever store a plaintext password in a database.
Let’s fix the first issue first as its fairly straightforward to address.
Remember the concept of KISS (Keep It Simple Stupid). Well the easiest way to check that the user has confirmed their password, and that both match before inserting the user into the database is to add a simple if statement. This can be implemented like below.
// check the passwords match and are not blank
if (txtPassword.Text == txtPasswordConfirm.Text && txtPasswordConfirm.Text != "")
{
     // setup the new object read for insertion
     var Login = new Login();
     Login.Username = txtUsername.Text;
     Login.Password = txtPassword.Text;

     // once the object is built insert it into the database
     context.Login.Add(Login);
     context.SaveChanges();
}
The addition of the if statement has given us greater control. It checks that the password entered matches, and that we have a password entered. However it’s not very user friendly as it doesn’t return an error if there is an issue. To fix this let’s add an else to our if statement. I’ll shorten the code sample above to save space, the code above will be referred to as creation logic from this point forwards…
// check the passwords match and are not blank
if (txtPassword.Text == txtPasswordConfirm.Text && txtPasswordConfirm.Text != "")
{
     // creation logic here
}
else
{
     MessageBox.Show("Your passwords don't match!");
}
This will now supply some feedback if there is an issue.
We’ve now dealt with a negative outcome, so what about if the user is successfully created. I would suggest showing a success message box and then clearing the inputs so that you can create another user if required. Your code could look something like below.
if (txtPassword.Text == txtPasswordConfirm.Text && txtPasswordConfirm.Text != "")
{
     // setup the new object read for insertion
     var Login = new Login();
     Login.Username = txtUsername.Text;
     Login.Password = txtPassword.Text;

     // once the object is built insert it into the database
     context.Login.Add(Login);
     context.SaveChanges();

     // display a success messsage
     MessageBox.Show("User added successfully!");

     // clear the textboxes so that they're ready to use again
     txtUsername.Clear();
     txtPassword.Clear();
     txtPasswordConfirm.Clear();
}
Encrypt the Password
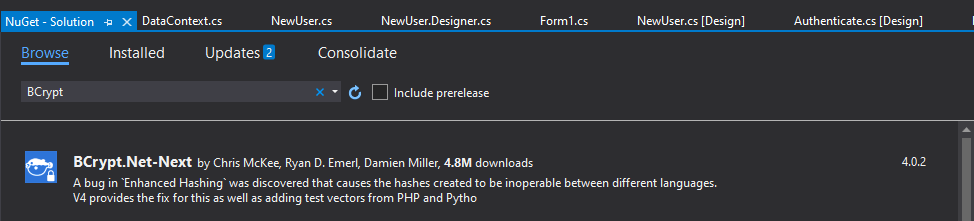
You should be using a secure encryption algorithm to make this work. BCrypt is one such algorithm. Remember we have used the NuGet Package Manager so far. This can be useful for adding key, tried and tested functionality to your applications. No one said write the BCrypt algorithm, because why would you? - but we need to make use of it.
Search for BCrypt in the NuGet Package Manager and add the following package to your project.
Once we have this package installed we can then change our creation logic code slightly to the following.
// setup the new object read for insertion
var Login = new Login();
Login.Username = txtUsername.Text;
Login.Password = BCrypt.Net.BCrypt.HashPassword(txtPassword.Text);
Notice how we’re now asking the application to encrypt the password, before its being saved in the database. Let’s have a look at the difference in our database.
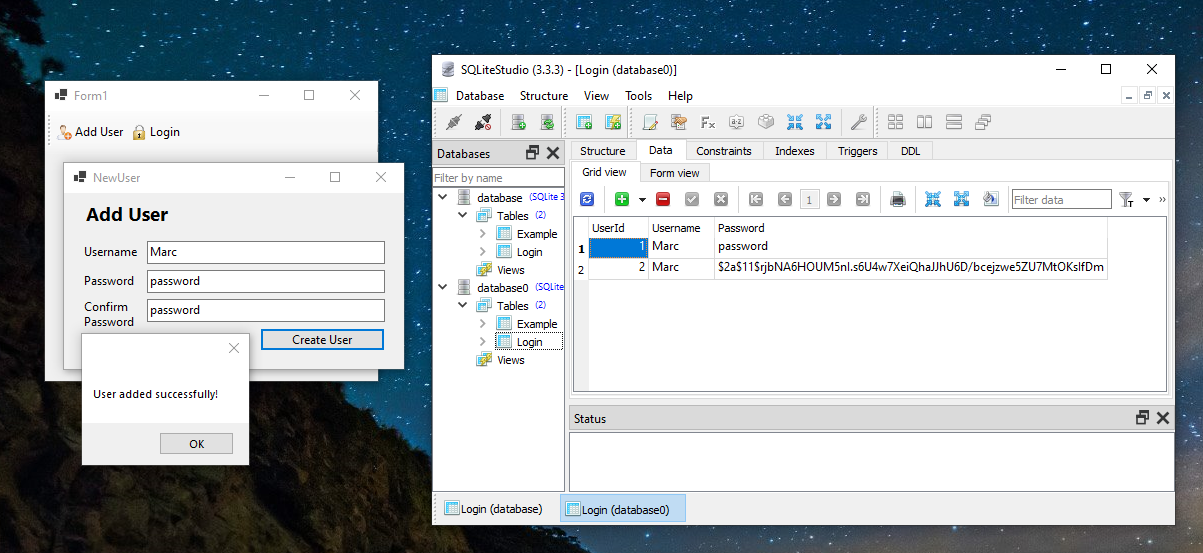
The password was the same, but look at the difference in how it’s stored. This leads us onto our next issue also, we now have a duplicate username in our database, that shouldn’t happen!